A simple tool to control your moRFeus device from your Linux-computer or Raspberry Pi
Designed only for moRFeus device (RF mixer/generator made by Outernet/Othernet).
Product informations : https://store.othernet.is/products/morfeus-1
This tool was written using only 'yad' as GUI and bash to make my moRFeus user life easier.
Fixes, added live-plot, progress-bar during step-sequence.
Abort during step-sequence is now possible by pressing the "cancel" button
GNUPlot (gnuplot AND gnuplot-qt packages) is not mandatory, only optional.
Initial version (april 2018) is available here : https://github.com/LamaBleu/moRFeus_GUI/tree/initial-apr2018
Another tool to control your moRFeus device over network, using TCP requests/telnet commands, HTTP status.
CLI available from shell for local use.
Please follow this link : https://github.com/LamaBleu/moRFeus_listener
Reporting bug, issue, ideas or just share experience, you are welcome : here on github, @fonera_cork (twitter), lama.bleu (gmail), /u/samarrangepas (reddit)
Short video showing installation and step-generator on Linux 64bits platform : here
Automatic install :
git clone https://github.com/LamaBleu/moRFeus_GUI
cd moRFeus_GUI
sudo -H ./GUI_moRFeus.sh
At first launch the script will try to download the morfeus_tool from Outernet website, then perform installation tasks.
You will be asked to choose 32, 64 bits or armv7 (RPi) version.
In case of trouble, re-launch install by deleting morfeus_tool file (if present).
See also troubleshooting section on this README.
Depending your environment, the "ssh -XC pi@<RPi_ip_address>" option is also very interesting to launch GUI_moRFeus from remote RPi if you don't need a remote full X-Windows desktop (means: don't connect using VNC/RDP).
At launch actual moRFeus settings are collected and displayed on the first three lines.
The main GUI window is intuitive, each button describing the performed function.
Nothing else to say.
3-minutes video showing use of step-generator and plotting : youtube
Step generator mode will allow to increment the frequency (switched to generator mode) by steps (Hz) of regular interval (seconds)
Power can be set at this moment. moRFeus device will toggle to generator mode.
Steps can be negative (decremental steps) if F-start > F-end
Sending freq to GQRX/VFO allow you to follow the signal in GQRX during the stepping-sequence.
Try to listen the audio signal (set GQRX in CW mode) of the generator. Very stable and clean !
Here is an example : screenshot and related audio
When using this feature please consider :
- think first what you will do with your generator:
this can take lot of time, example: if you chose F-start=150MHz F-end=450MHz Step 1000Hz, hop every 10 seconds --> 9hrs45mins ! - IMPORTANT REMINDER : is not allowed to play everywhere in RF spectrum !
- use moRFeus as RF generator and GQRX (local or remote) to test antennas, filters, receiver performance. Get signal level at regular steps accross the RF spectrum and store results in CSV file. Then plot results.
. prepare your stuffs, antenna, receiver, adjust levels, ppm calibration and gain on GQRX (set it first to central frequency of the range you will study)
. enable remote control from GQRX. If GQRX is running on remote computer you have to allow client IP address in GQRX remote control settings.
. go to step-generator mode, and select start/stop freqs, power. Choose "send Freq to GQRX : VFO". Run stepper, wait...
. at the end of process csv file is generated (freq level) in ./datas directory
. Only if gnuplot and gnuplot-qt packages are installed, a resulting plot will be displayed, and saved to ./datas/ directory
. full example is provided in ./datas/ directory, with gnuplot script to plot again graph from CSV file.
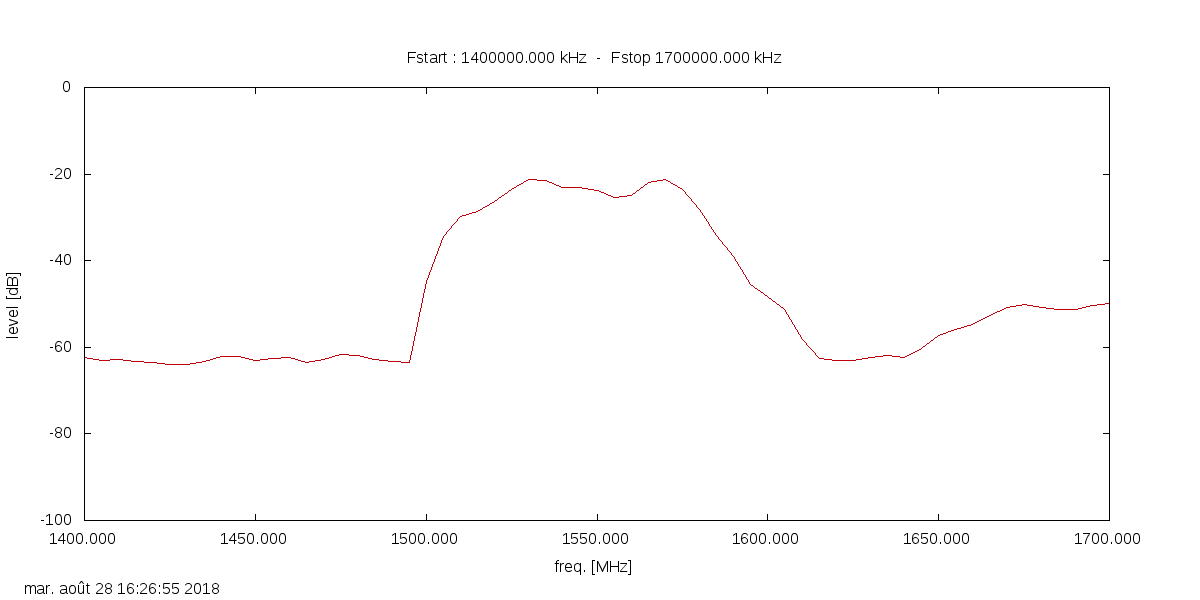
Here is an example, testing the LNA-SAW filter from NooElec.
This plot is shown on the video above :

more infos here on : https://www.rtl-sdr.com/using-an-rtl-sdr-and-morfeus-as-a-tracking-generator-to-measure-filters-and-antenna-vswr/
Informations about GQRX: http://gqrx.dk (thanks to Alex for nice and continuous work ;) )
Adapt following parameters in GUI_moRFeus.sh file to GQRX settings (should be OK by default for local use)
GQRX_ENABLE=1
GQRX_IP=127.0.0.1
GQRX_PORT=7356
From the main window, you can :
- read actual GQRX VFO and LNB_LO values.
- transfer the moRFeus freq to the GQRX VFO (generator mode, listen moRFeus signal)
- transfer the moRFeus freq to GQRX LNB_LO (moRFeus mixer mode).
GQRX is now displaying the real frequency (mixer + GQRX VFO) !
- reset GQRX LNB_LO freq. to 0
- sudo or not sudo ?
my choice is to stay as simple user with no sudo/root rights, and I must admit this can be boring. However ...
sudo :
Install may fail sometimes, depending on your platform, distrib, local or remote access (RDP/VNC).
Main symptom : you are not asked to download the version of morfeus_tool, and script will downlad 32bits version by itself. Workaround is to first delete 'morfeus_tool' executable, then try another combination for sudo, like gksudo, sudo -H to launch GUI_moRFeus.sh
not sudo :
Update udev rules for moRFeus applying intructions from here
- GQRX link : check remote control settings menu, to allow remote computer to control VFO
Details on GQRX website : http://gqrx.dk/doc/remote-control - You can check connection usinc
ncornetcatcommand to GQRX:
by sending 'f' or 'l' command to GQRX you should receive actual VFO frequency (f) or signal level (l)
nc 127.0.0.1 7356
l
-66.2
f
1296502310
Program runs a little bit slower with GQRX support enabled.
If you don't use GQRX you can disable the feature by setting GQRX_ENABLE=0 on GUI_moRFeus.sh file
Thanks to Outernet/Othernet team, Othernet forum contributors, Carl from rtl-sdr.com blog, Alex OZ9AEC.
Special thanks to Psynosaur and Konrad WA4OSH for sharing ideas, time and experience.

