Table of Contents
Starstorm 2 is a work-in-progress RoR2 port/sequel of Starstorm, a diverse gameplay and content mod for Risk of Rain 1. It features four new survivors, over 20 new items and equipment, and a new, dangerous event to shake up your runs.
Currently Starstorm 2 is a team-driven effort and many ideas are heavily baked in-house before making it to the mod. As a result of this, it is heavily recommended to discuss any planned large-scale contributions (content such as new survivors, items, etc.) before developing them to ensure everything is good to go. Contact of this type can be made in our Discord server, or you can directly message swuff★#2224.
Understand that large-scale pull requests may be turned down if not discussed beforehand!!! Please come to us before implementing.
That said, if you are looking to contribute to the project, set-up instructions can be found below:
-
You'll need:
- Unity Hub
- Unity version 2019.4.37f1 (Available from: https://unity.com/releases/editor/archive)
- A Git client (IE: GithubDesktop, Gitkraken, etc)
-
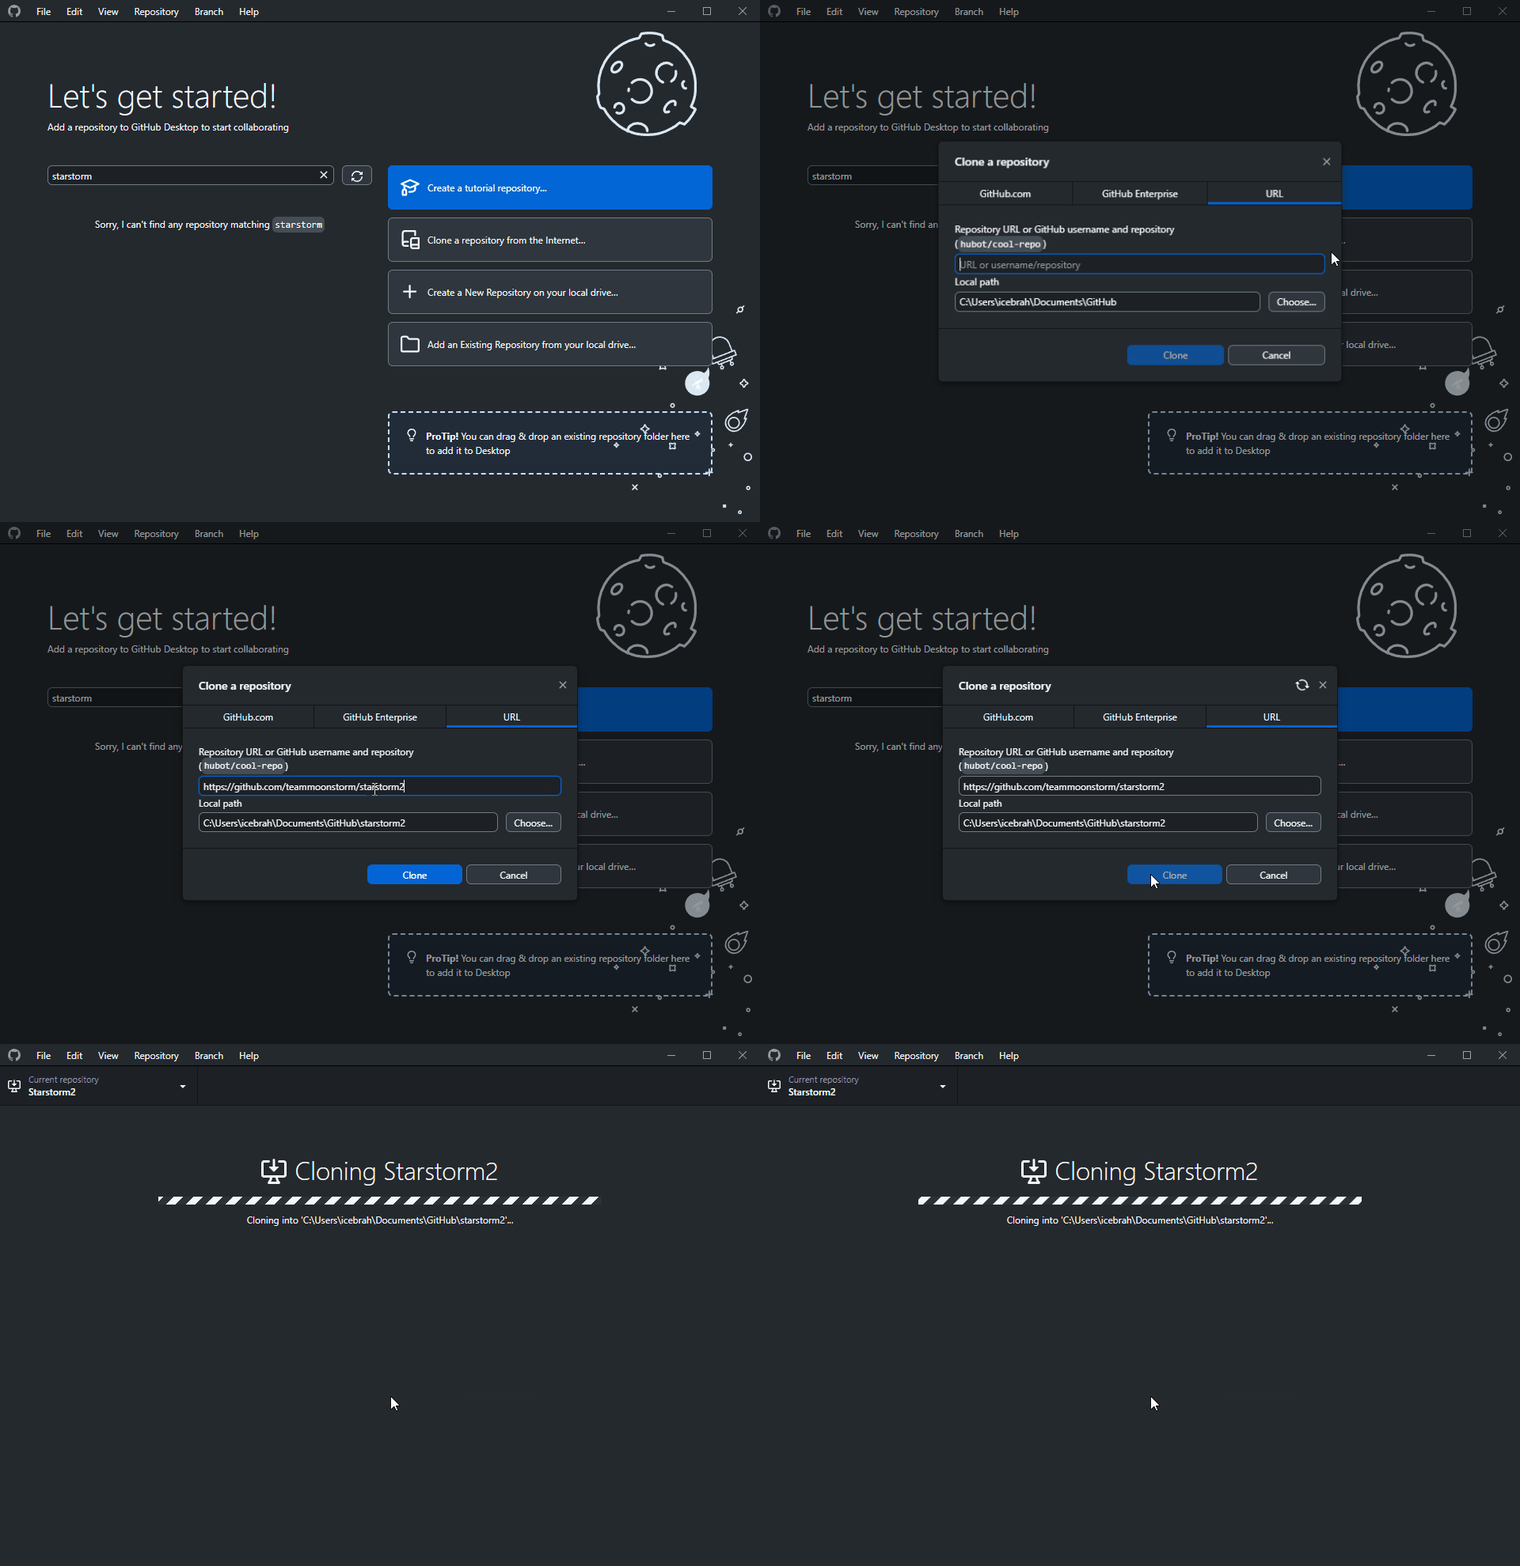
Begin by cloning the repository to your hard drive.
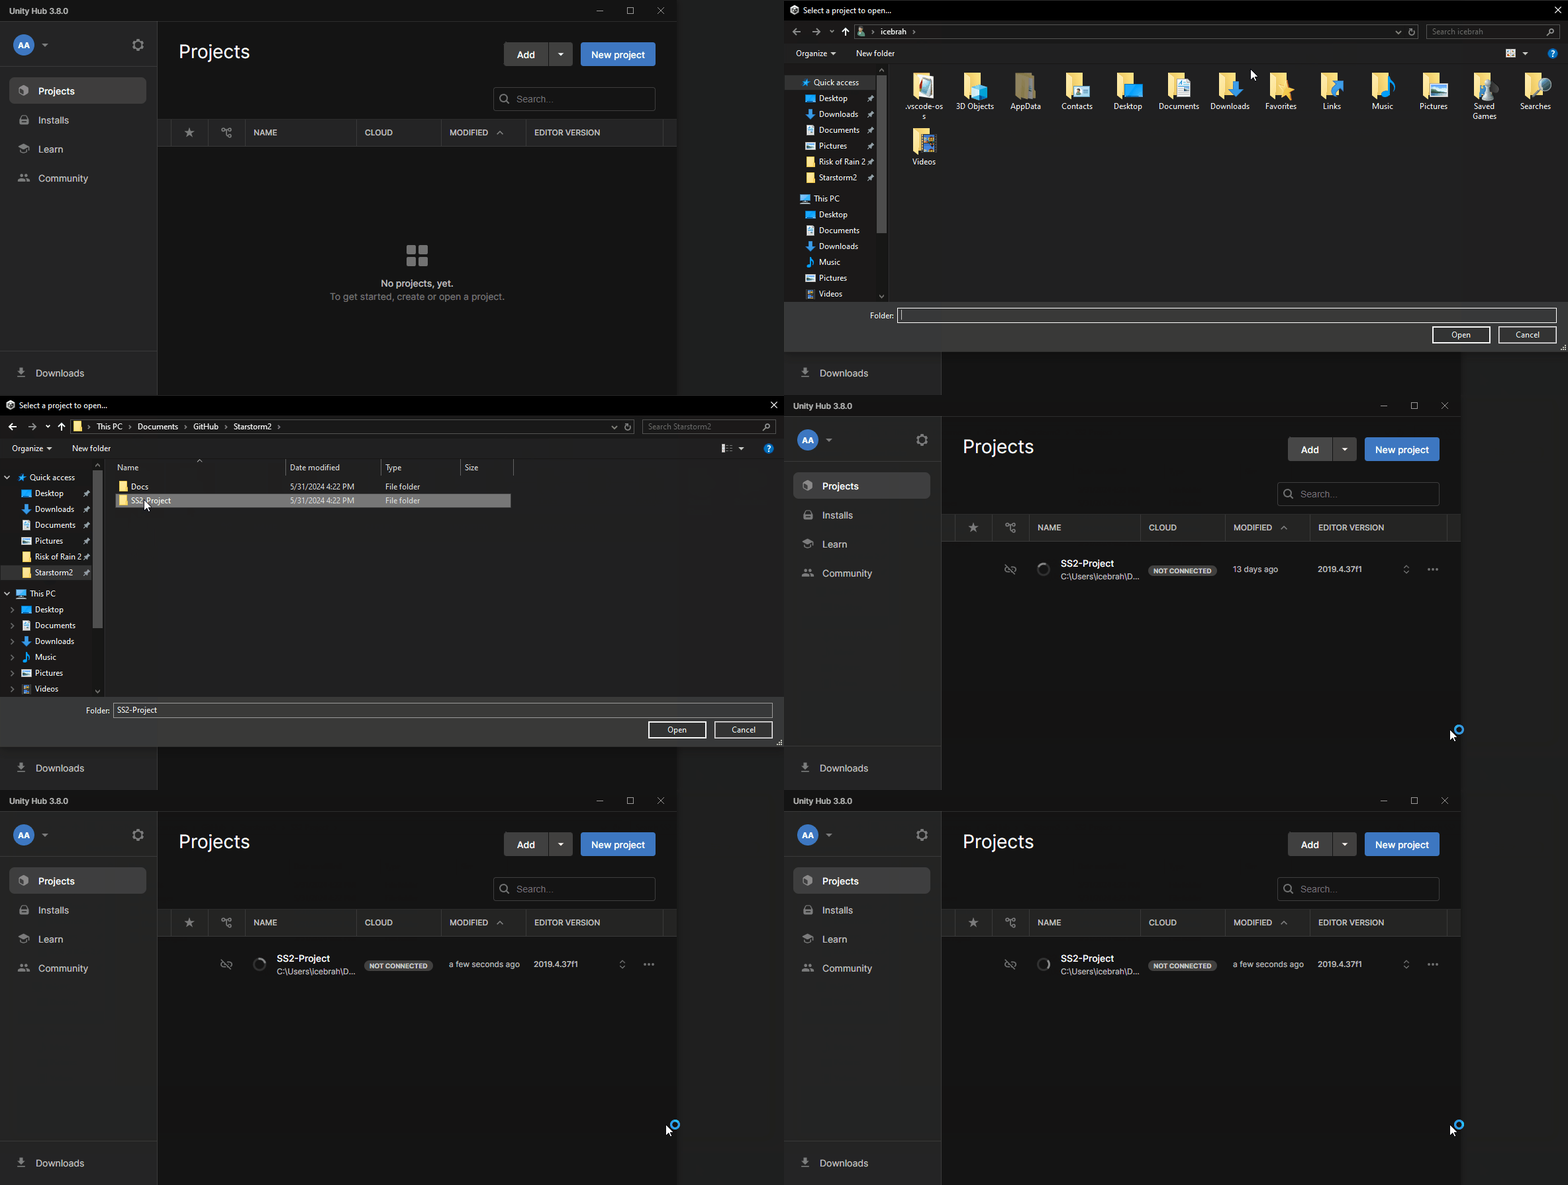
- Once the project downloads, open the
SS2-Projectfolder with Unity 2019.4.37f1. Keep in mind that opening the project for the first time will take time, so patience is key.
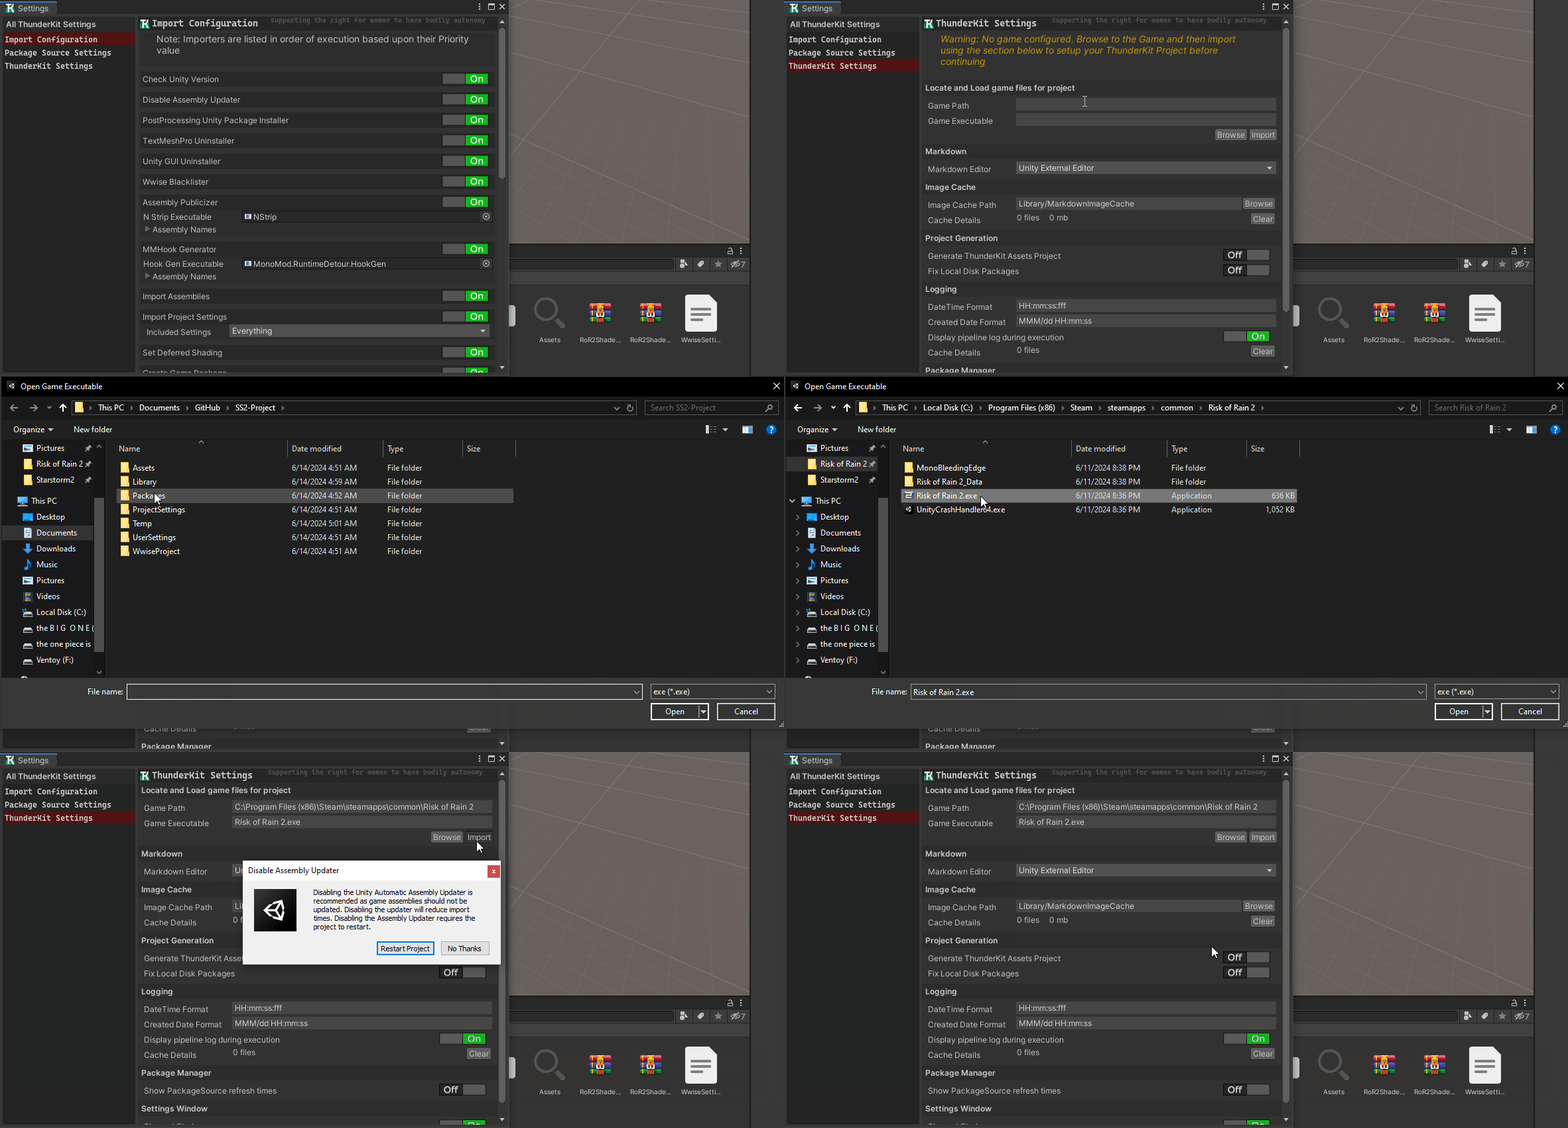
- During your importing or opening the project, or any other scenario, there is a chance you'll see this box pop up. Always hit "No Thanks", as hitting the other option WILL cause issues with specific assemblies.
- Once the project opens, you'll have a bunch of errors, these errors are normal, and are caused by missing RoR2 assemblies. To fix this, Go to
Assets/ThunderKitSettingsfolder and look for the "ImportConfiguration" file.- If there are no Configuration Executors, delete the ImportConfiguration so Thunderkit can regenerate it.
- If no configurations exist after this, please contact Nebby and ask for help.
- Once the import configurations are created, go to Tools/Thunderkit/Settings
-
Select the Import Configurations, ensure that your configurations match the one from the image.
- If you can't find one of the configurations, delete the import configuration.
-
Make sure your import config matches the following:
| Importer Name | Enabled or Disabled | Extra Config |
|---|---|---|
| Check Unity Version | Enabled | |
| Disable Assembly Updater | Enabled | |
| PostProcessing Unity Package Installer | Enabled | |
| TextMeshPro Uninstaller | Enabled | |
| Unity GUI Uninstaller | Enabled | |
| Wwise Blacklister | Enabled | |
| Assembly Publicizer | Enabled | Publicize at least RoR2.dll and KinematicCharacterController.dll |
| MMHook Generator | Enabled | Generate MMHook assemblies for at least RoR2.dll and KinematicCharacterController.dll |
| Import Assemblies | Enabled | |
| Import Project Settings | Enabled | Set the enum to Everything |
| Set Deferred Shading | Enabled | |
| Create Game Package | Enabled | |
| Import Addressable Catalog | Enabled | |
| Configure Addressable Graphics Settings | Enabled | |
| Ensure RoR2 Thunderstore Source | Enabled | |
| Install BepInEx | Enabled | |
| R2API Submodule Installer | Enabled | Hit disable all button, the Serialized Hard Dependencies will stay enabled |
| Install RoR2MultiplayerHLAPI | Disabled | |
| Install Ancient Scepter | Enabled | |
| Install RoR2EditorKit | Disabled | |
| Install Dependencies | Enabled | |
| Get Bitness | Enabled | |
| Beep | Enabled | |
| Prompt Restart | Enabled |
- Select
ThunderKit Settingsand click Browse.- Find your RoR2 Executable, select it
- Hit Import
- You're now ready to start development.
Currently, Starstorm2 has two branches.
- Main: This branch contains the current Minor (IE: 0.4) version on ThunderStore, The branch itself is used exclusively for pushing Patches and Bugfixes.
- Indev: This branch contains all the new and WIP content for the mod. New content that's going to be added to the next Minor version on ThunderStore. Once the team feels like the amount of content is good enough, this branch is merged into Main.
For contributors, what you need to know is the following:
- Create pull requests to
mainif you wish to submit bugfixes/patches of the current thunderstore version - Create pull requests to
indevif you wish to submit new features/content.
Q: How do I build?
- A: Do the following:
- Go into Assets/ThunderkitRelated/Contributor
- Click on the Nebby folder
- Press
Ctrl+Dto duplicate, rename the duplicate to your username - Enter the duplicate folder
- Rename pipelines, and path assets
- Click the "Build" pipeline
- On the Copy job, click Destination, make sure the destination is the same name as your Path asset, enclosed by <>
- Click the "TestingPath" asset
- On the Constant path component, set the value to your R2ModMan profile's plugins folder
- You can find the plugins folder for your profile by going to Settings->Browse Profile Folder
- Running the build pipeline should output the built mod into your r2modman profile
Q: Any mods I should have on my r2modman development profile?
- A: We recommend using the
SS2Dev_1718366591833.r2zfound in the Docs/ folder, as this profile code contains all the dependencies and configuration. You can import a r2modman profile from a file by clicking the "Import/Update" button on the r2modman profile selection screen.
Q: I'm still having errors in the console after importing
- A: Try reimporting RoR2 as in some cases Thunderkit settings aren't set correctly on the first game import.
Q: I am having missing references errors in my Visual Studio to various parts of RoR2/Networking/etc
- A: Delete all your packages and package-lock file found under the Packages/ folder and reimport the game exe following the same thunderkit import configuration settings/guide up above
Q: I'm having an issue where certain components cannot be added or general instability
- A: Make sure you didn't leave Install RoR2MultiplayerHLAPI and Install RoR2EditorKit enabled, having these enabled will cause issues due to duplicate assemblies
Q:I am having an issue with importextensions saying thunderkit is not found (or an error with Player scripts)
A: Here is a fix by Orbeez 
Q: My Shader Dict does not appear in Unity -> Project Settings
A: Inside the packages folder and in the Risk of Rain 2 folder you need to edit the package file to the correct ror2 version 
Q: I'm having an issue where there are compiler errors due to DamageAPI/RecalcStatsAPI/OtherR2APISubmodule is missing
- A: Some of the project's soft dependencies such as AncientScepter still rely on the old R2API and as such, when they're installed, it installs R2API version 4.x.x, causing duplicate types in the project. To fix this, just delete the R2API folder in the packages folder.
Q: I am getting errors about missing NewtonsoftJson.dll?
- A: Uninstall ror2bepinexpack with the thunderkit package manager then install it again OR use the dll in our development discord thats pinned and place it inside packages\BepInExPack\BepInExPack\BepInEx\core
Q: The RoR2EK CharacterBody wizard does nothing and returns an error in the console OR my CharacterBody is missing Network components
- A: In the project tab of Unity, scroll down to packages, and right click Risk of Rain 2, select "reimport", repeat the same for Multiplayer HLAPI
Q: When I build my project using the pipelines no DLL is created
- A: Check the pipeline log, it usually logs anything and everything regarding issues with the build process, there's also a high chance that a duplicate MMHook assembly (such as AssemblyCSharp mmhook) is causing issues. If this is the case, go into HookGenPatcher's plugins folder and delete MMHOOK_AssemblyCSharp.dll
Q: I fetched origin on my fork, and now i have general instability and/or weird error logs on my console.
- A: This tends to be normal and usually caused when a dependency is updated on the package's manifest file. we recommend doing the following:
- Close your unity project
- Go to the project root folder
- Open the Packages folder
- Select everything on the folder EXCECPT
manifest.jsonandpackages-lock.json - Delete the selected contents
- Open your unity project
- Reimport your game, remember that the correct import configuration can be found here


