So you’ve got your modlist all nice and ready and are now onto the process of creating lods for your game. But how do I do them, and how do I make sure my shows my updated trees and terrain?
Well, you’re in luck as this guide goes over how to do it. We’ll not be covering all the settings, rather just how to run it and what you’ll need to run it. We also cover A Clear Map of Skyrim settings and how to get a pretty map using the latest version. Grass Lods are covered in a seperate guide as they are a bit more complex. If you are wanting to use grass lods, please follow this guide up to the TexGen section and then use the additional grass lods guide.
Note: This guide is only for Mod Organizer 2 users.
Here is a list of things you will need:
- The latest xLodGen and SSE Tamriel Extended.esm
- DynDOLOD 3.00
- DynDOLOD 3.00 Reources
- Unique Map Weather Framework (Optional)
- A Clear Map of Skyrim and Other Worlds
- ACMOS Road Generator
- Far Object LOD Improvement Project SSE
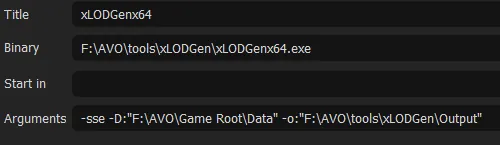
xLodGen, ACMOS Road Generator Tool and DynDOLOD should be installed to the tools folder of wherever your Mod Organizer is. In this case, it’s Tinvaak\Tools. Once they are there, open your Mod Organizer. Create a new mod named Grass Cache. Add the x64 versions of xLodGen, TexGen and DynDOLOD as executables. We use the x64 as we are modding Skyrim SE and it is a 64-bit game. Note: You must add -sse to the arguments section for xLodGenx64, TexGenx64 and DynDOLODx64; otherwise they will fail to run.
For xLodGen, after the -sse line, you must add the argument -o:"x:\Path\To\Output" to ensure that the generated files go to the correct location and also regen the vanilla meshes. This output folder cannot be in a folder that is read by MO2 to create the virtual file system. Place it somewhere like C:\Games\xLodGen Output. You may need to zip the output afterwards to ensure that it can be installed as a mod by MO2. An example of how it should look is below.
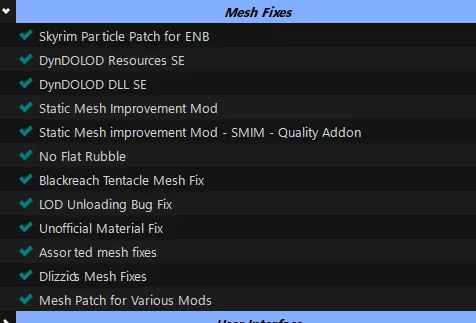
Install DynDOLOD 3.0 resources, checking all of the options aside from “Low-Res LOD Textures” and “Holy Cow”. If you are using Skyrim SE V1.6 or newer, you can leave the "Whiterun Exterior Grass" option unchecked. You can use the Low-Res LOD if you wish, but I think it’s best not to. Once you have it installed, you want it placed relatively high in your left pane. I have it positioned in the following location:
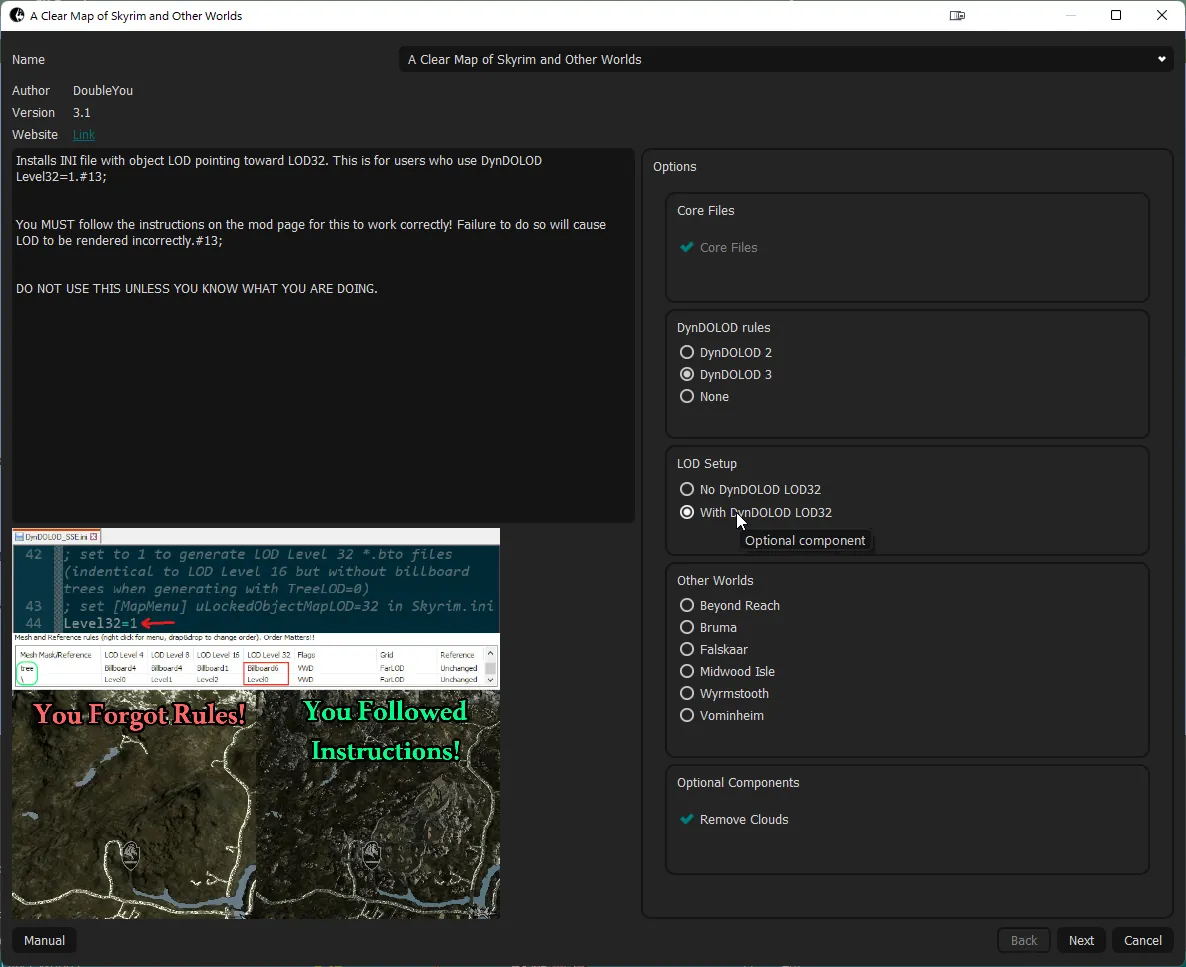
Once you have installed and positioned DynDOLOD resources, install Unique Map Framework. Ensure that you select the correct version of Skyrim you are modding. In this case, I am using version 1.6 so select the 1.6.x option. Next, you want to install A Clear Map of Skyrim (ACMOS). Tick the options as shown in the picture below to ensure that the correct settings are installed.
Once you have ACMOS installed, install FOLIP and place it just below it on the left hand side.
Finally, you’ll want to install the SSE-Terrain-Tamriel Extended ESM. This is only needed during xLodGen and can be placed anywhere in the left pane of MO2. I tend to place it above the xLodGen Output. Once installed, activate it only when doing xLodGen and place it below the last worldspace ESM in your load order. In my case, this is Wyrmstooth.
- Note: Your ESMs will all be bold in MO2's Plugin list, even though they may not necessary be named with an
.esmextension.
NOTE: The load order towards the end of your list should be as follows:
- Other late loaders such as Lux, Water For ENB, Northern Roads.
- ACMOS
- ACMOS Water for ENB patch
- FOLIP
- Synthesis
Once you have all of that installed and the output paths set, activate SSE-Terrain-Tamriel Extended and move it to the correct position in the right pane as mentioned in the previous section.
- Note: Some mods such as Majestic landscapes and Cathedral Landscapes come with files for Lod Generation. You will want to have these files activated during the process of running xLodGen.
Then select xLodGenx64 from the executables dropdown in MO2 and press Run. It will proceed to load your entire load order. When it is done, a Dialogue box will open similar to the following:
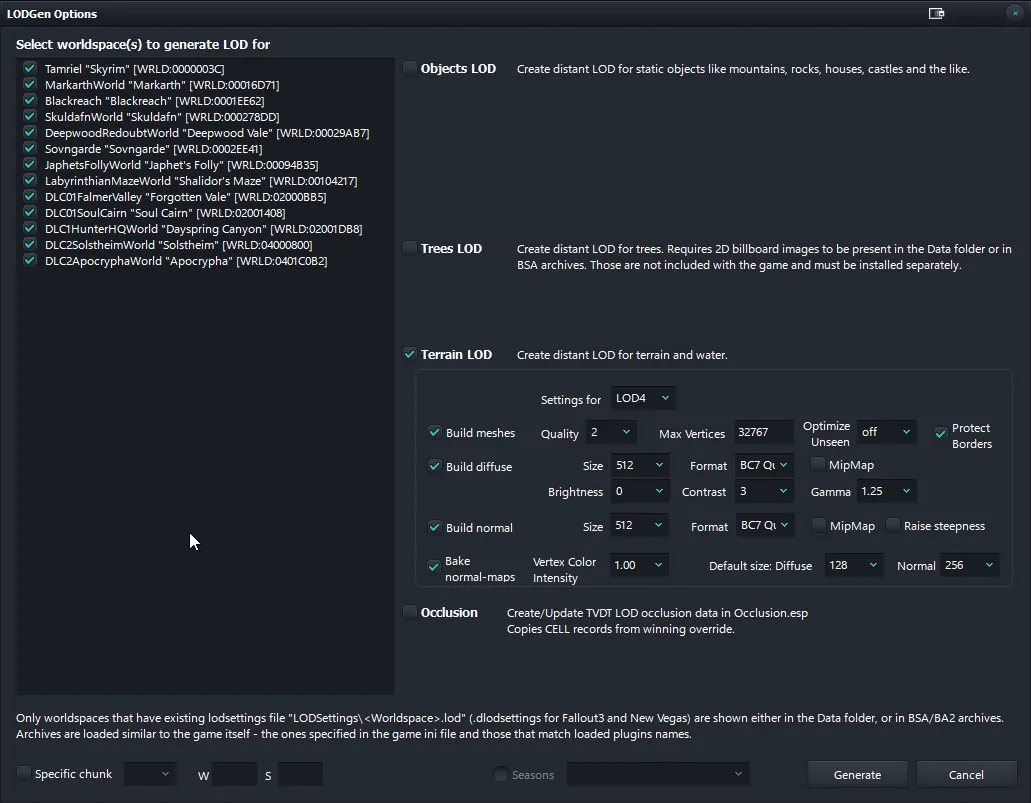
Right click in the Worldspace area and press Select All. Ensure that only Terrain Lod is selected and then apply your Lod settings. I use the STEP settings which include the required tweaks for ACMOS.
Press the Generate button and allow xLodGen to run and do its work. When complete, it will say “Lod Generation completed”. You can then close the program.
Navigate to where you have installed the ACMOS road gen tool and open the program. You will greeted by a screen similar to the one below:
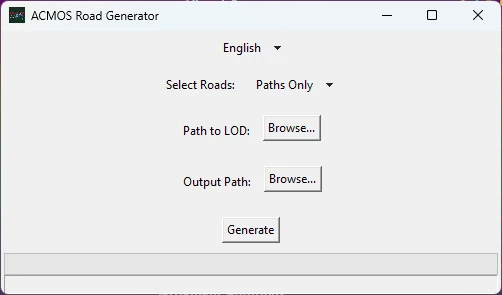
Ensure that Path Only is selected from the roads drop down section.
Click browse and navigate to where your xLodgen output folder is. Select the folder and press Generate. If a prompt appears asking if you wish to overwrite, press Yes. Allow the tool to run and do its work. Once it is done, it will offer you the option to zip the output. Say "No" and let it zip the folder. Once it has finished zipping it will say "All Done!" and you can the close the program.
Navigate to where your xLodgen output folder is and create a zip folder of it if it is not zipped. Press the Add mod from file button and navigate to where your zipped xLodGen output is. Press the open button and install it as a new mod. Activate the mod and then deactivate SSE-Terrain-Tamriel and any other mods that you activated for the xLodGen process.
If you are generating grass lods, now is the time to start following our guide on the process.
Run TexGenx64 and Allow the tool to load your mods and then choose the following settings. Note the output path as to where TexGen is sending the output.

If you have grass that has complex data for ENB, ensure that you generate HD Grass and not Grass. Use the settings from STEP which apply to your rendered game resolution. In my case, this is 1440p.
Press Start and allow the tool to generate the textures. Once done, the tool will open a pop-up. Press Exit or Zip&Exit if you wish to have the output zipped up for easier addition to a mod-manager or redistribution. In this case, we're choosing Zip&Exit as that allows us to add the output as a new mod in MO2 easier. Add the output as a new mod in Mod Organizer 2, and then activate it.
In order to have DynDOLOD start in advanced mode each time and enable the Lod32 setting required by ACMOS, you need to edit a line in the DynDOLOD_SSE.ini file. Navigate to where your DynDOLOD is located, open up the Edit Scripts folder, and then the DynDOLOD folder. Open the DynDOLOD_SSE.ini file and change the following lines:
Expert=1
Level32=1
Save the .ini file and reopen MO2.
NOTE: In this example, I am using DynDOLOD DLL NG which enables a large reference bug workaround. This is NOT recommended for usage unless you absolutely know what you are doing. If a list you are using includes it, then ensure that your settings match exactly what is shown in the picture below.
Ensure that your xLodGen and TexGen outputs are active. Run DynDOLODx64 and allow it to load all your mods. In the top left section where it lists worldspaces, right click and press select all. Load the relevant rules that you want, in this case we’ll load high rules. Set your settings to be the same as this:
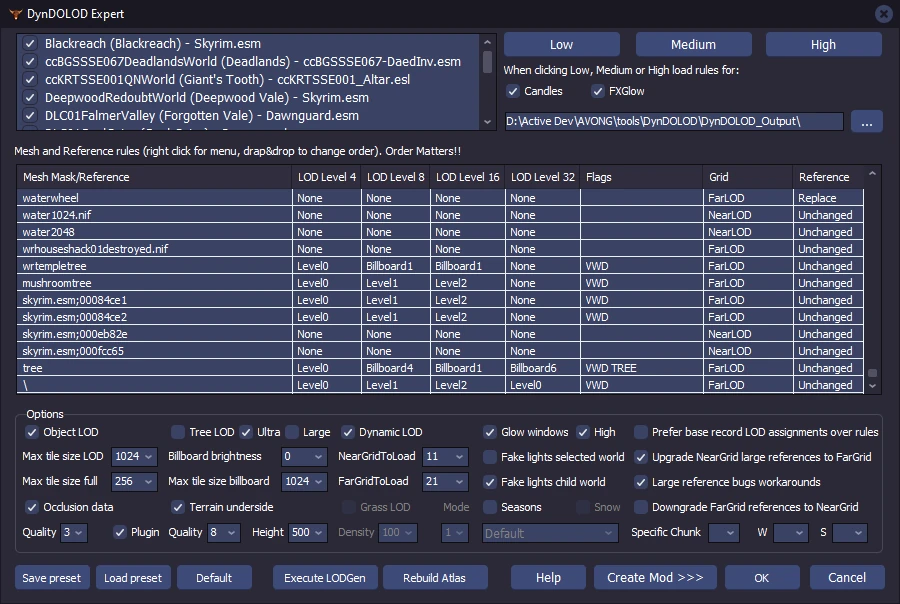
Another note on settings. Billboard brightness is one that you adjust if you find that your lods are too bright in game. I have this set lower due to some of the tree mods I use. Ultra trees generates 3D tree lod and can be performance-intensive depending on the tree mods you use. However, Ultra Tree lods do get unloaded wheras the hybrid lods do not. I personally recommend using 3D tree lod as the visual quality difference is substantial for a minor perforamnce defecit. Anything above 1024 on tile size billboard is not recommended as you are beyond the threshold of visual quality to performance. And finally, the rules govern how DynDOLOD will generate things and at what quality.
- Note: Certain tree mods require specialised tree rules in order for them to render properly in the worldspace. Known mods that require them include: Myrkvior, Trees Addon SE, Happy Little Trees and Skyrim Flora Overhaul. It is likely there are more tree mods that require special rules. I use the following tree rules (taken from the Happy Little Tree DynDOLOD addon page): LOD4/Level0, LOD8/Billboard4, LOD16/Billboard(1), LOD32/Billboard(6).
- Notes: ACMOS requires the Tree and \ rule to be edited in order to display properly. The following settings are needed:
Tree: LOD32/Billboard(6);\: LOD32/Level0.
DynDOLOD 3.0 now includes Occlusion as part of it's toolset so we no longer need to generate Occlusion via xLodGen. I recommend the settings shown in picture above for generation as these are very similar to the original one's used in xLodGen occlusion.
Once you have configured the settings how you wish, click OK and DynDOLOD will begin its generation. This can take a very long time depending on how many worldspaces you have, as well as your system specifications. DynDOLOD 3.0 is multi-threaded now so on machines with multiple cores, it may complete faster than you think, if you've used DynDOLOD before. Once it is completed, a pop-up will appear. As with TexGen, you have the option to either Save&Exit or Save&Zip&Exit. Again, the choice is yours however in this guide we'll choose to zip it up as well.
- Note: I strongly recommend choosing
Save&Exitcompared toSave&Zip&Exitif you are going to be uploading your lods to somewhere for others to download. You should compress the output using 7zip and the7zformat onultracompression settings. It will make a considerable difference.
Add the zipped output file as a new mod in MO2, name it DynDOLOD Output and activate the mod. On the right pane, DynDOLOD.esm should be moved to be the last ESM after your worldspace mods. In my case, that is Wyrmstooth so I place it after Wyrmstooth.esm. DynDOLOD.esp should be the second last and Occlusion.esp shoud be the last plugin in your load order unless you have Synthesis in which that would be last.
With the advent of Seasons of Skyrim and recent updates to DynDOLOD, seasonal lods can be created to provide matching distant detail for the season you are in. They are, also, very easy to generate and require only or two changes to create.
To have seasonal xLodGen output, tick the seasons checkbox in the bottom left and select which seasons you wish to have terrain lod for. Note: This will take a lot longer than normal non seasonal generation.
To have seasonal DynDOLOD output, tick the Seasons checkbox, the snow checkbox, and then select the seasons you wish to have DynDOLOD for. Note: This will take a lot longer than normal non seasonal generation.