pulstack is a developer-friendly tool that lets you deploy static websites to AWS (S3 + CloudFront) or GitHub Pages with zero configuraton. It uses Pulumi under the hood to treat infrastructure as code, so your deployments are fully automated and version-controlled.
Pulstack is perfect if you:
- Have a static website (HTML/CSS/JS or React/Vite/Next.js build)
- Want to deploy to AWS (S3+CloudFront) or GitHub Pages in 1 command
- Don’t want to write YAML, CloudFormation, or Terraform
- Like simple CLI workflows with guided and simple prompts
-
🚀 Deploy static sites to AWS S3 with CloudFront CDN
-
🌍 Automatically create Repo and publish to GitHub Pages
-
🔒 Secure AWS deployments using best practices (no public buckets!)
-
💡 Clean CLI prompts to guide you through setup
-
🧨 One-command destroy of your whole stack when you're done
You only need to install the tools for the provider you want to use (AWS or GitHub). Here's a breakdown:
node -vInstall it from https://www.pulumi.com/docs/install/
pulumi version
pulumi login
Important
You'll need to log in to Pulumi (Mandatory)
(for S3/CloudFront deployments only, You can skip this if you want to deploy on GitHub)
aws --versionIf not installed: https://docs.aws.amazon.com/cli/latest/userguide/install-cliv2.html
Create IAM user in aws console with necessary permissions
s3:*– Create and manage buckets, upload files, set bucket policies.cloudfront:*– Create and configure CloudFront distributions.iam:GetUser, iam:PassRole– Required for linking CloudFront with S3 via OAI.iam:CreateServiceLinkedRole– Needed for enabling AWS services like CloudFront.logs:*– For any logging resources created by Pulumi or AWS services.sts:GetCallerIdentity– Used by Pulumi to identify the active IAM user.
🔐 Configure AWS Credentials
aws configureYou'll need:
- AWS Access Key ID
- AWS Secret Access Key
- Default region (e.g., us-east-1)
Ensure credentials are valid:
aws sts get-caller-identityNote
Make sure the IAM user has the necessary permissions.
(for GitHub Pages only, You can skip this if you want to deploy on AWS S3)
-
Create a Personal Access Token(Classic) with
repoanddelete_repopermission enabled. -
Save this somewhere safe — you’ll need it during
init.
.
├── index.js              # Entry CLI to handle commands
├── deploy.js             # AWS S3 + CloudFront deployment logic
├── deployGithub.js       # GitHub Pages deployment logic with Pulumi
├── destroy.js            # Stack destroy logic
├── pulumiProgram.js      # Defines AWS infra using Pulumi
├── config.json           # User config file generated at init
├── public/               # Your static site directory (e.g. index.html, assets)
├── init.js               # The init logics
💡 This structure is generated or expected after running node index.js init.
git clone https://github.com/Kiran1689/pulstack.git
cd pulstack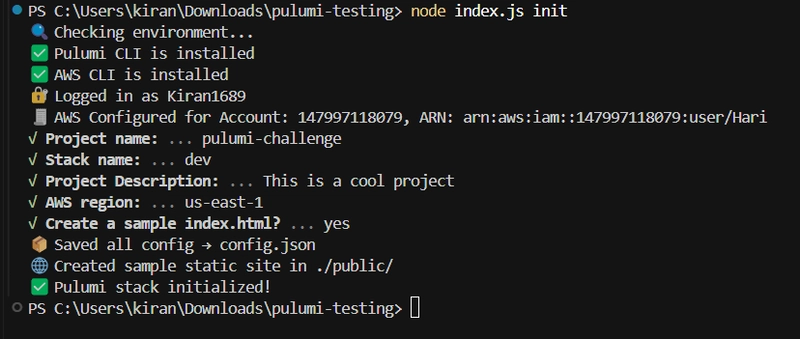
npm installnode index.js initFollow the prompts:
-
Project name
-
Description
-
Stack name (e.g., dev)
-
AWS region
-
Option to auto-generate public/index.html to quick test Pulstack instantly — even without any files!
The config.json file will be created to store your inputs locally.
node index.js init --githubFollow prompts:
-
GitHub repo name
-
Stack name (e.g., dev)
-
Build dir (e.g., ./build or ./public)
-
GitHub token (with repo + delete permissions)
The config.json file will be created to store your inputs locally.

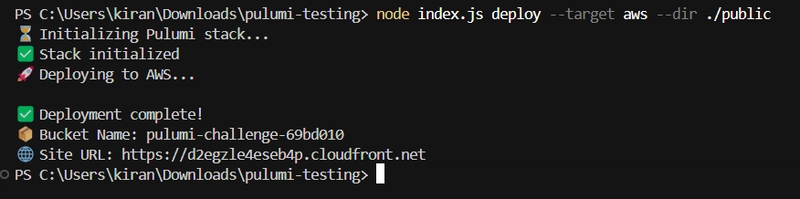
node index.js deploy --target aws --dir ./public
# --dir ./public Points to your static site files. For React apps, use ./build
What will happen after running this?
📁 public/
   │
   └── node index.js deploy --target aws
             ↓
       Pulumi provisions:
       - ✅ S3 Bucket
       - ✅ Uploads static files
       - ✅ CloudFront CDN
             ↓
       🌐 S3 Bucket name
       🌐 Returns your site URL!
✅ On success, you'll see:
-
AWS S3 bucket name
-
Live CloudFront URL
Note
You can replace ./public with your build folder (./build, ./dist, etc.)
Note
In AWS S3 console, the bucket name will be your project name
node index.js deploy --target aws --dir ./publicWhat will happen after running this?
📁 public/
   │
   └── node index.js deploy --target github-pages
             ↓
       Pulumi provisions:
       - ✅ Creates a new repo
       - ✅ Pushes static content to gh-pages (using simple-git)
       - ✅ Enables GitHub Pages
             ↓
       🌐 Outputs a live site URL!
✅ On success, you'll see:
- GitHub Pages URL

Note
You can replace ./public with your build folder (./build, ./dist, etc.)
To destroy the stack run:
node index.js destroyNote
The stack name and project name will be fetched from the config.json file
Inspired by the power of Pulumi and the simplicity of static hosting. Feel free to fork, extend, and customize!
Contributions, issues and feature requests are welcome! Feel free to check issues page.
Open an issue or start a discussion. Let's build better deployments together with pulumi.
This project is licensed under the MIT License.