-
Notifications
You must be signed in to change notification settings - Fork 47
Using Titanoboa as an alternative to Ansible
I built titanoboa to be a flexible workflow tool, that can be as scalable and performant as possible while also being reliable and fault tolerant.
My initial aim was to use it as a lightweight and flexible Enterprise Service Bus (ESB) that would be cloud ready, platform independent and easily scalable. I know that in the world of micro-services and serverless hype, the ESB has become a non-cool, even dirty, word and whoever uses it automatically gives away his year of birth, which I am sure can be no later than early Pleistocene.
But even in companies with heavy focus on services, there is often a need for a simple lightweight-yet-robust integration layer that can be used as a wrapper for those (legacy) systems that cannot cater for particular API requirements. Also often you need to orchestrate various API calls and you just cannot (or do not want to) offload the orchestration onto the client.
But somehow, almost by accident, I just found out I can also use titanoboa for radically different purpose: IT automation. This means using it to automate builds and deployments. Something you normally use Cheff/Puppet for or - if you are concerned about using agents (as I am) - Ansible.
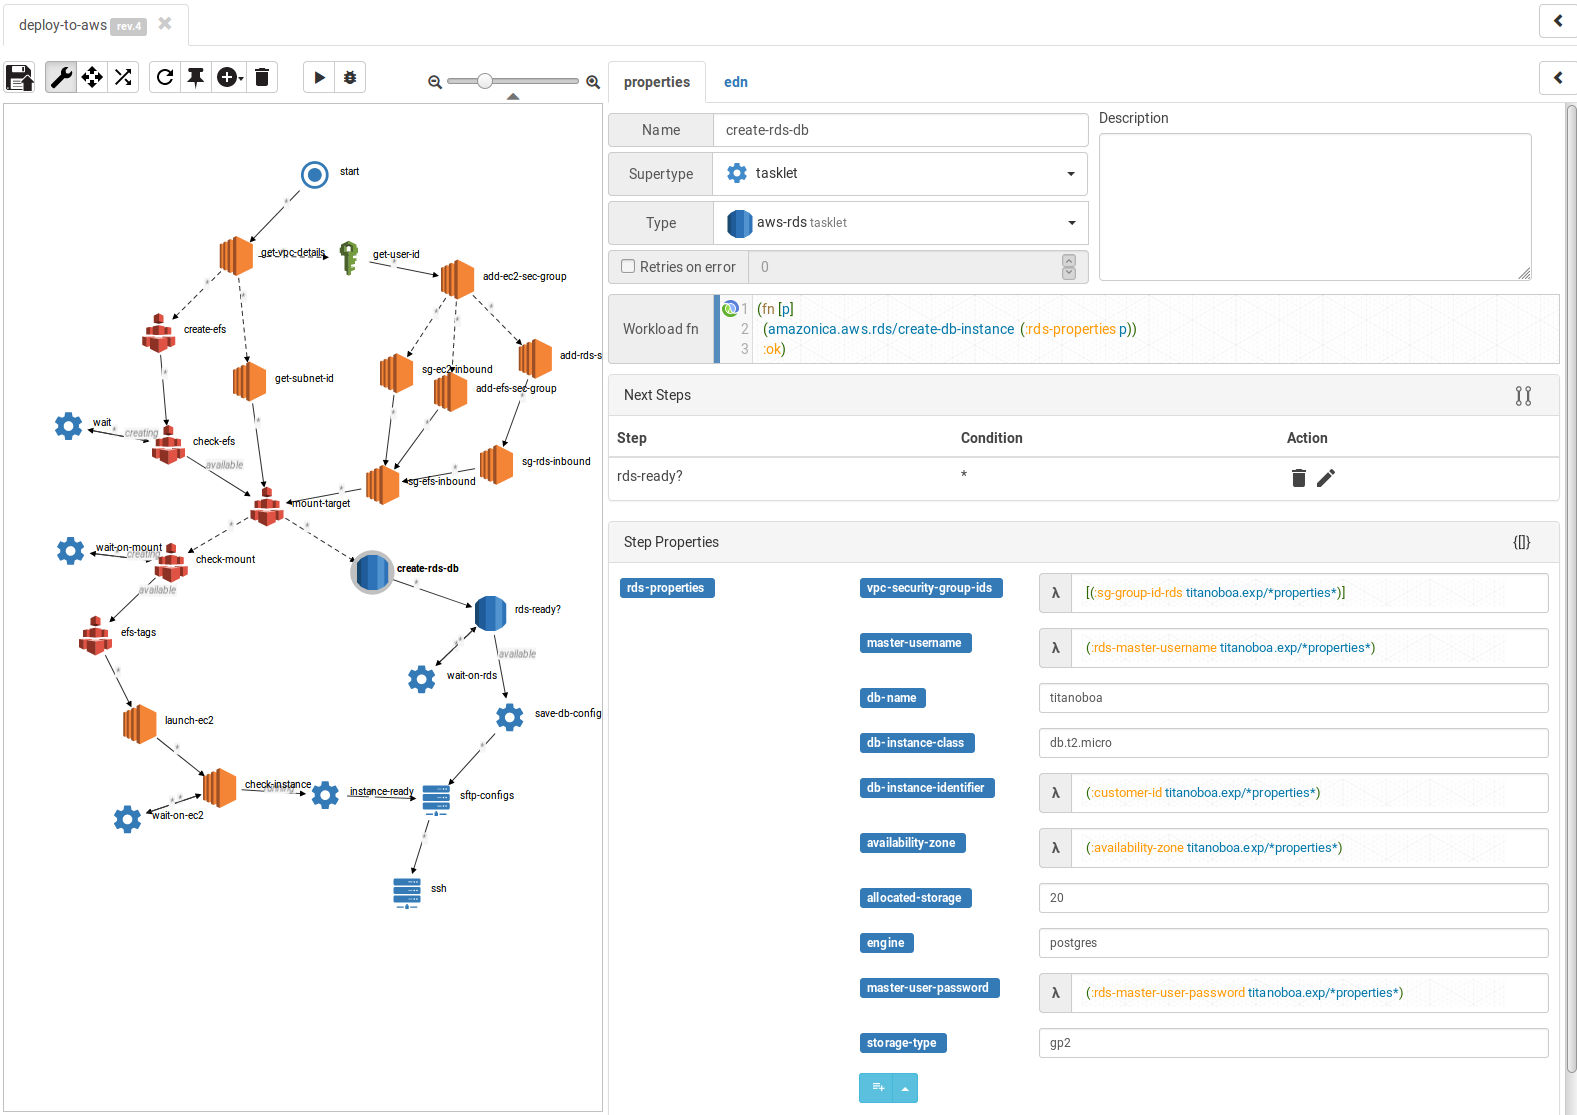
Since I often need to provision new titanoboa instances in cloud (mainly AWS) I had a bunch of scripts to do that and was going to use Ansible to put more structure to it. But before I did that I just tried an experiment: how would titanoboa handle such workflow? And I went on and built it:
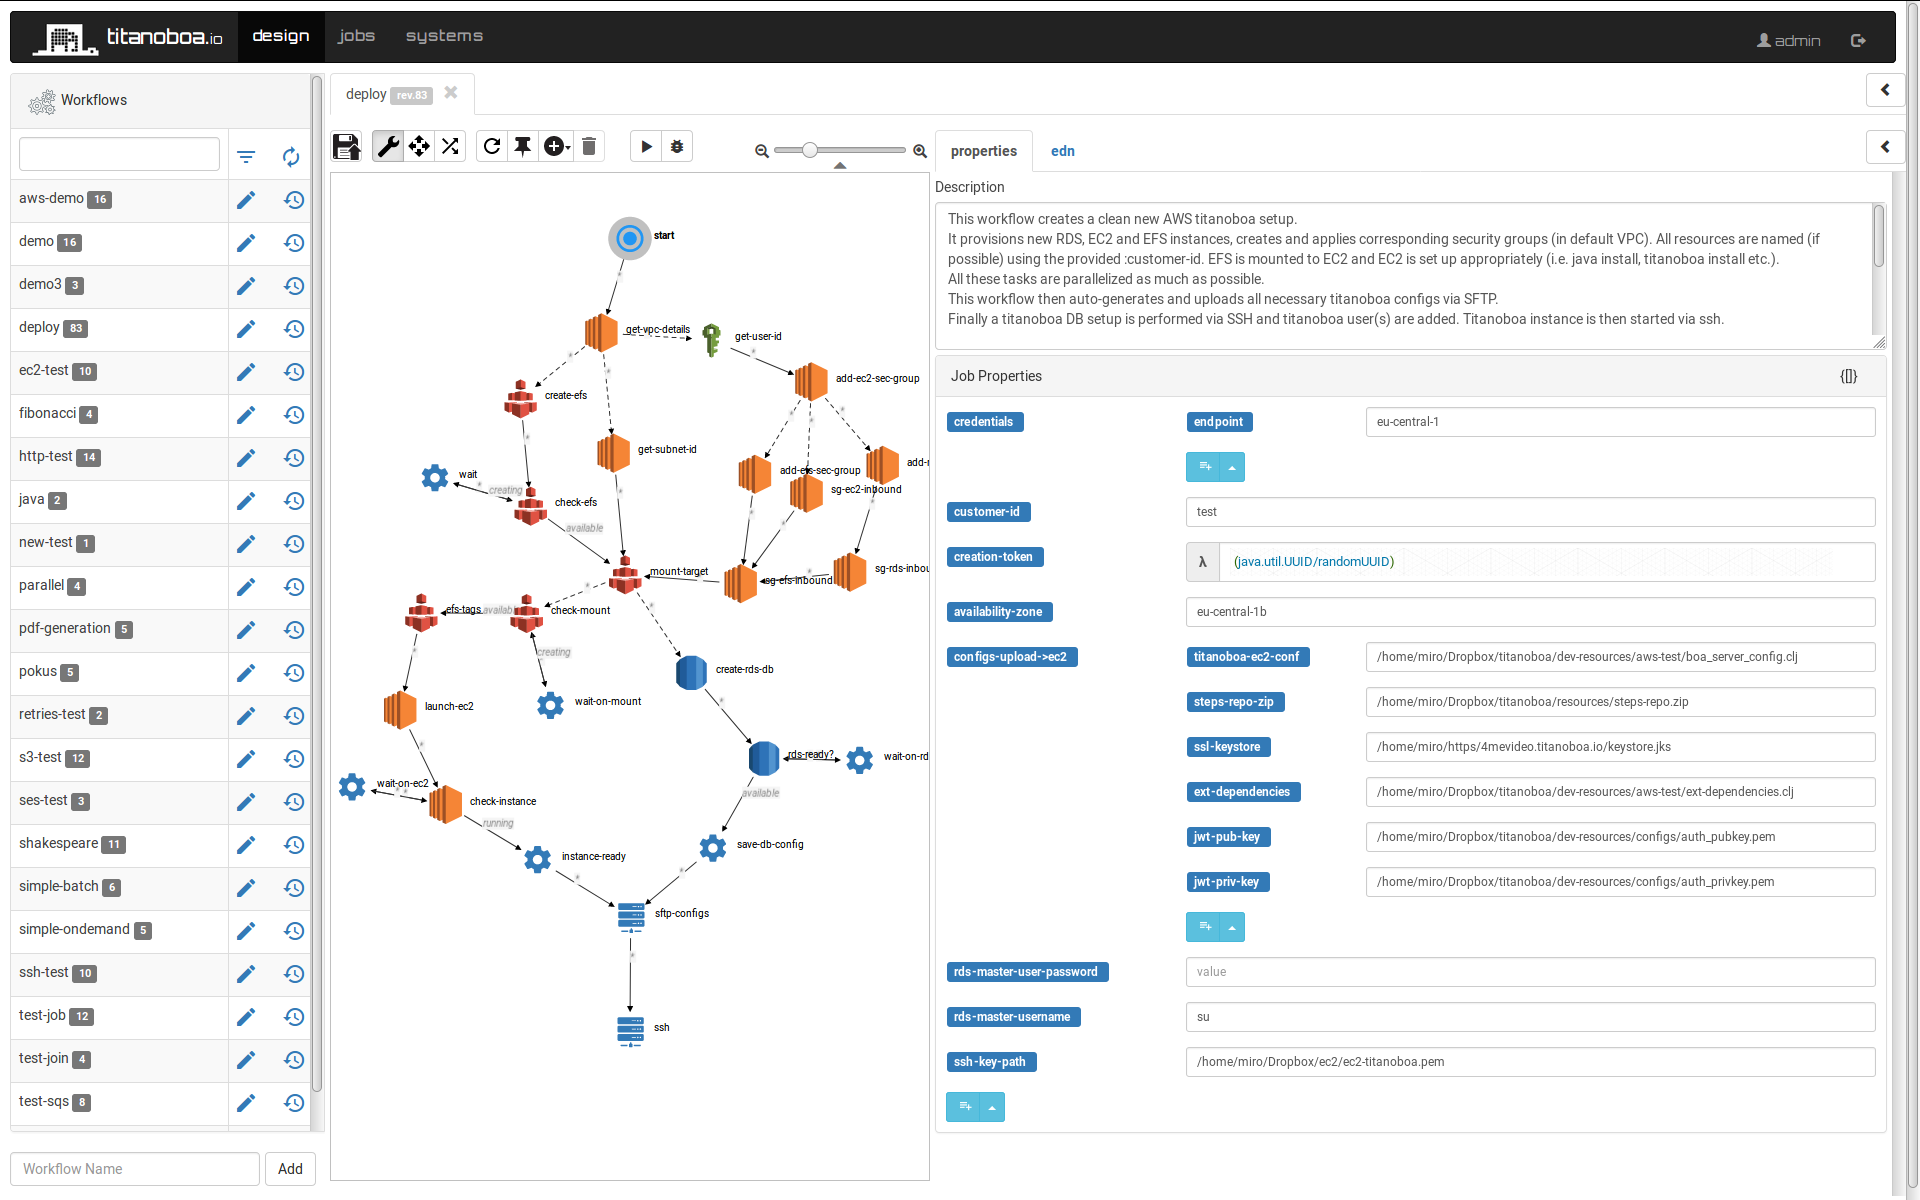
And it actually worked! I did not give titanoboa any breaks and I leveraged fully its parallel processing capabilities (even found a bug in the process), so whatever tasks can be run in parallel, they are.
The whole workflow can be found in this github repository. The workflow basically creates a clean AWS setup with dedicated RDS, EFS and EC2 instances with fresh titanoboa setup running. Step-by-step it does following:
- using provided AWS credentials (or credentials set in env properties) and EC2 key pair it:
- obtains information about user's default VPC and its subnets
- creates a new security groups dedicated for RDS, EFS and EC2
- creates a new EFS instance (in the corresponding security group) and mounts it to specified subnet
- creates a new RDS instance in the corresponding security group and assigns it specified user credentials
- creates a new EC2 instance using specified AMI
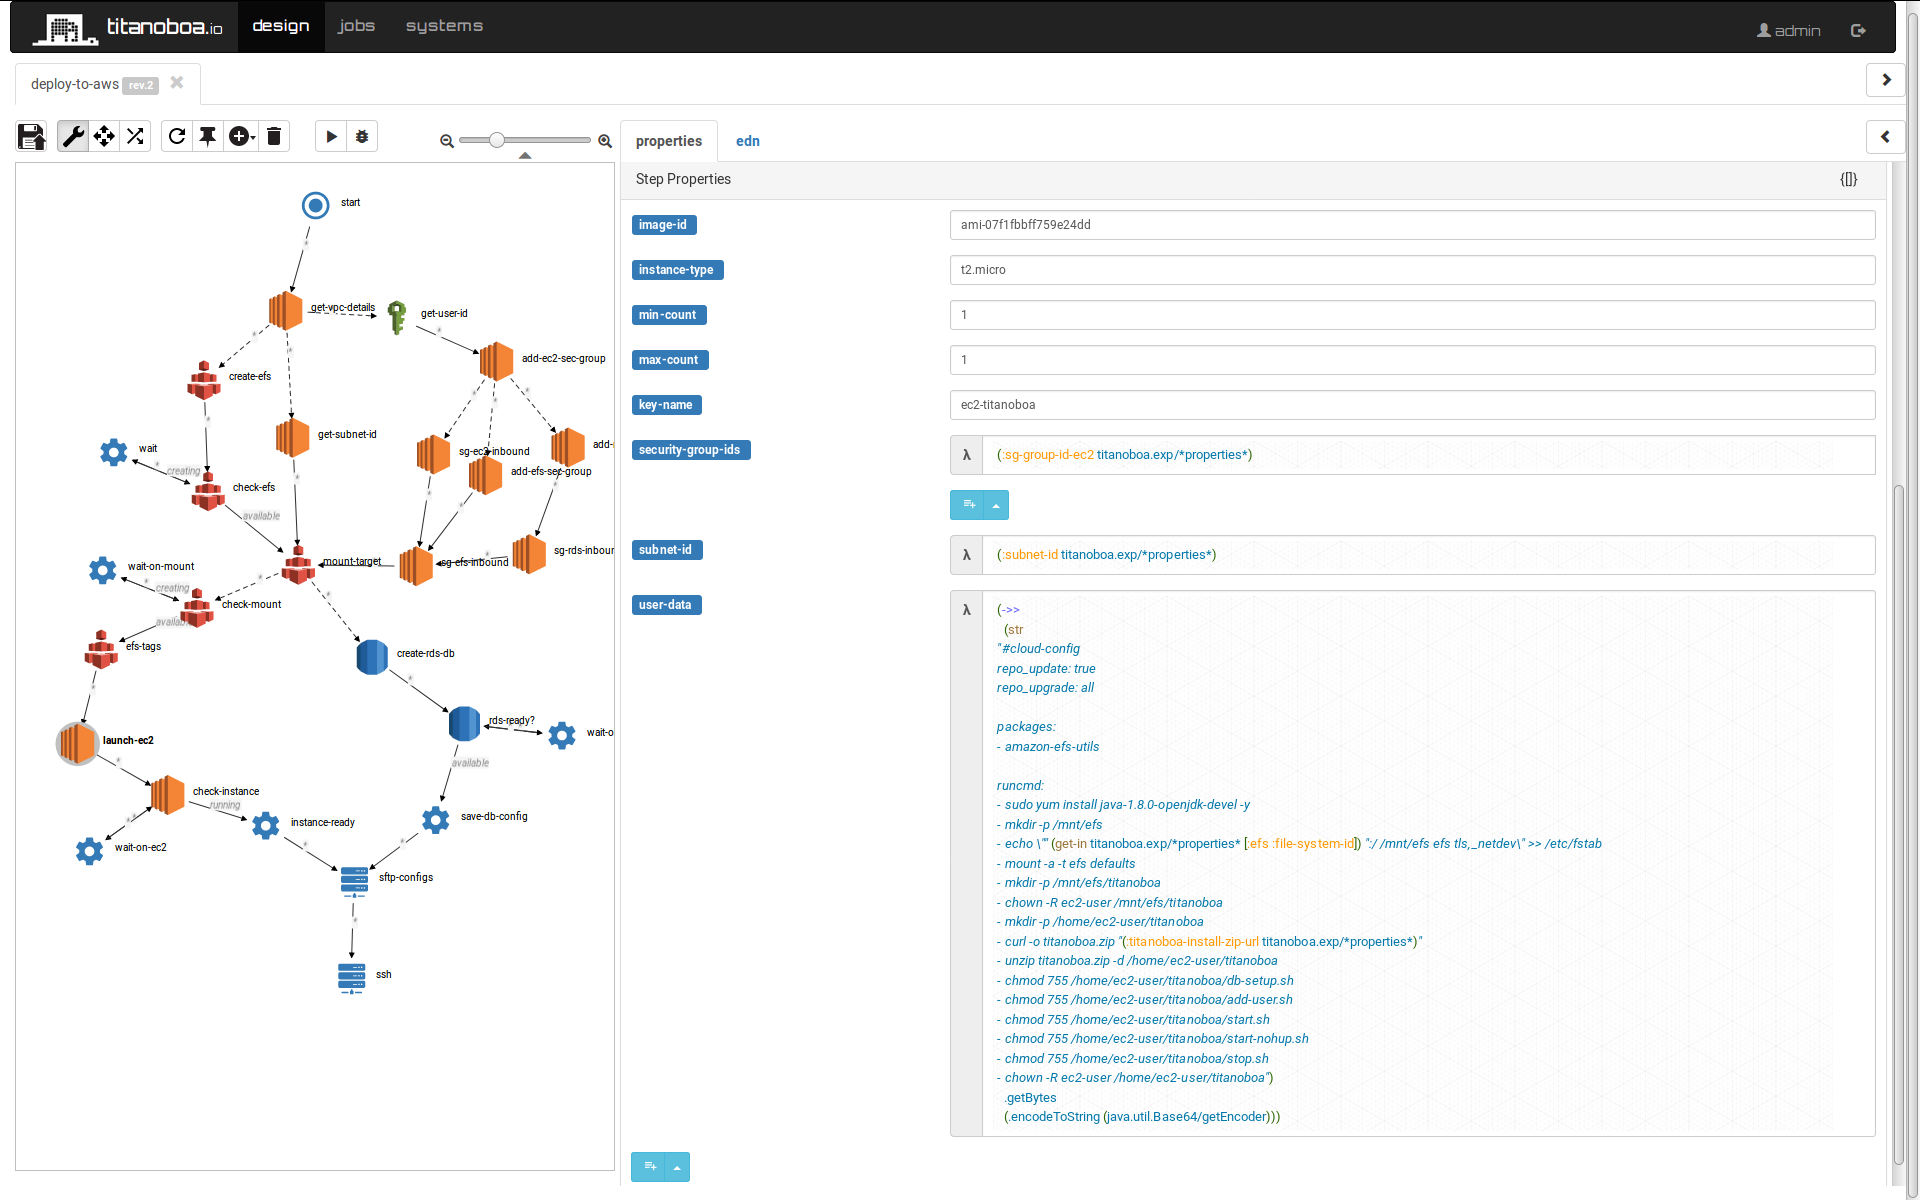
- specifies EC2 user data to
- mount EFS
- install java
- download titanoboa zip from specified URL and install it
- set up necessary directory structure and file permissions
- automatically generates all necessary titanoboa configuration (using provided template)
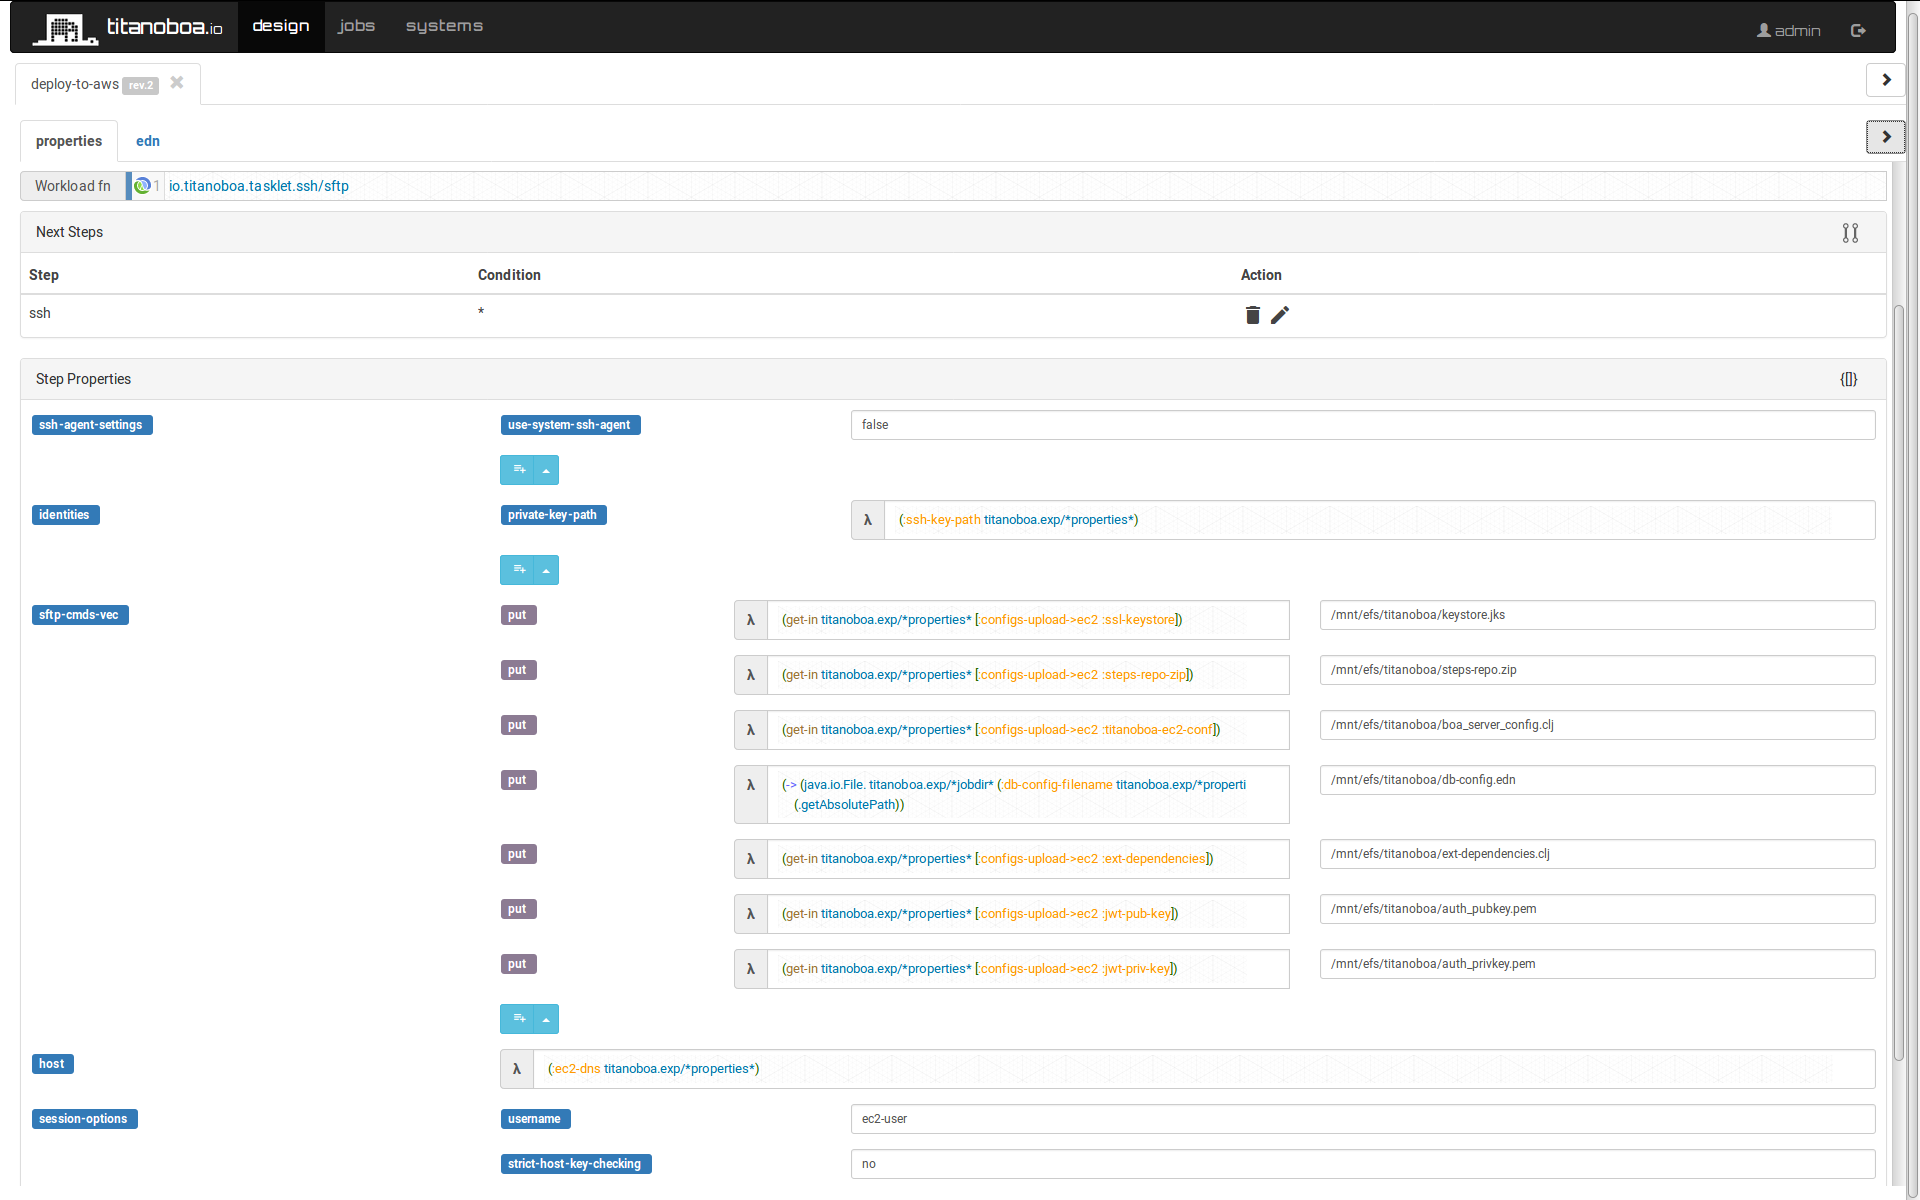
- uploads to the EC2 server via sftp:
- titanoboa configuration files
- all other necessary resources (e.g. SSL keystore as well as JWT key pair for authentication)
- connects to the EC2 server via SSH to
- run titanoboa's scripts to set up its database (for user authentication and job archival);
- add new specified titanoboa users and their credentials
- start titanoboa on port 443
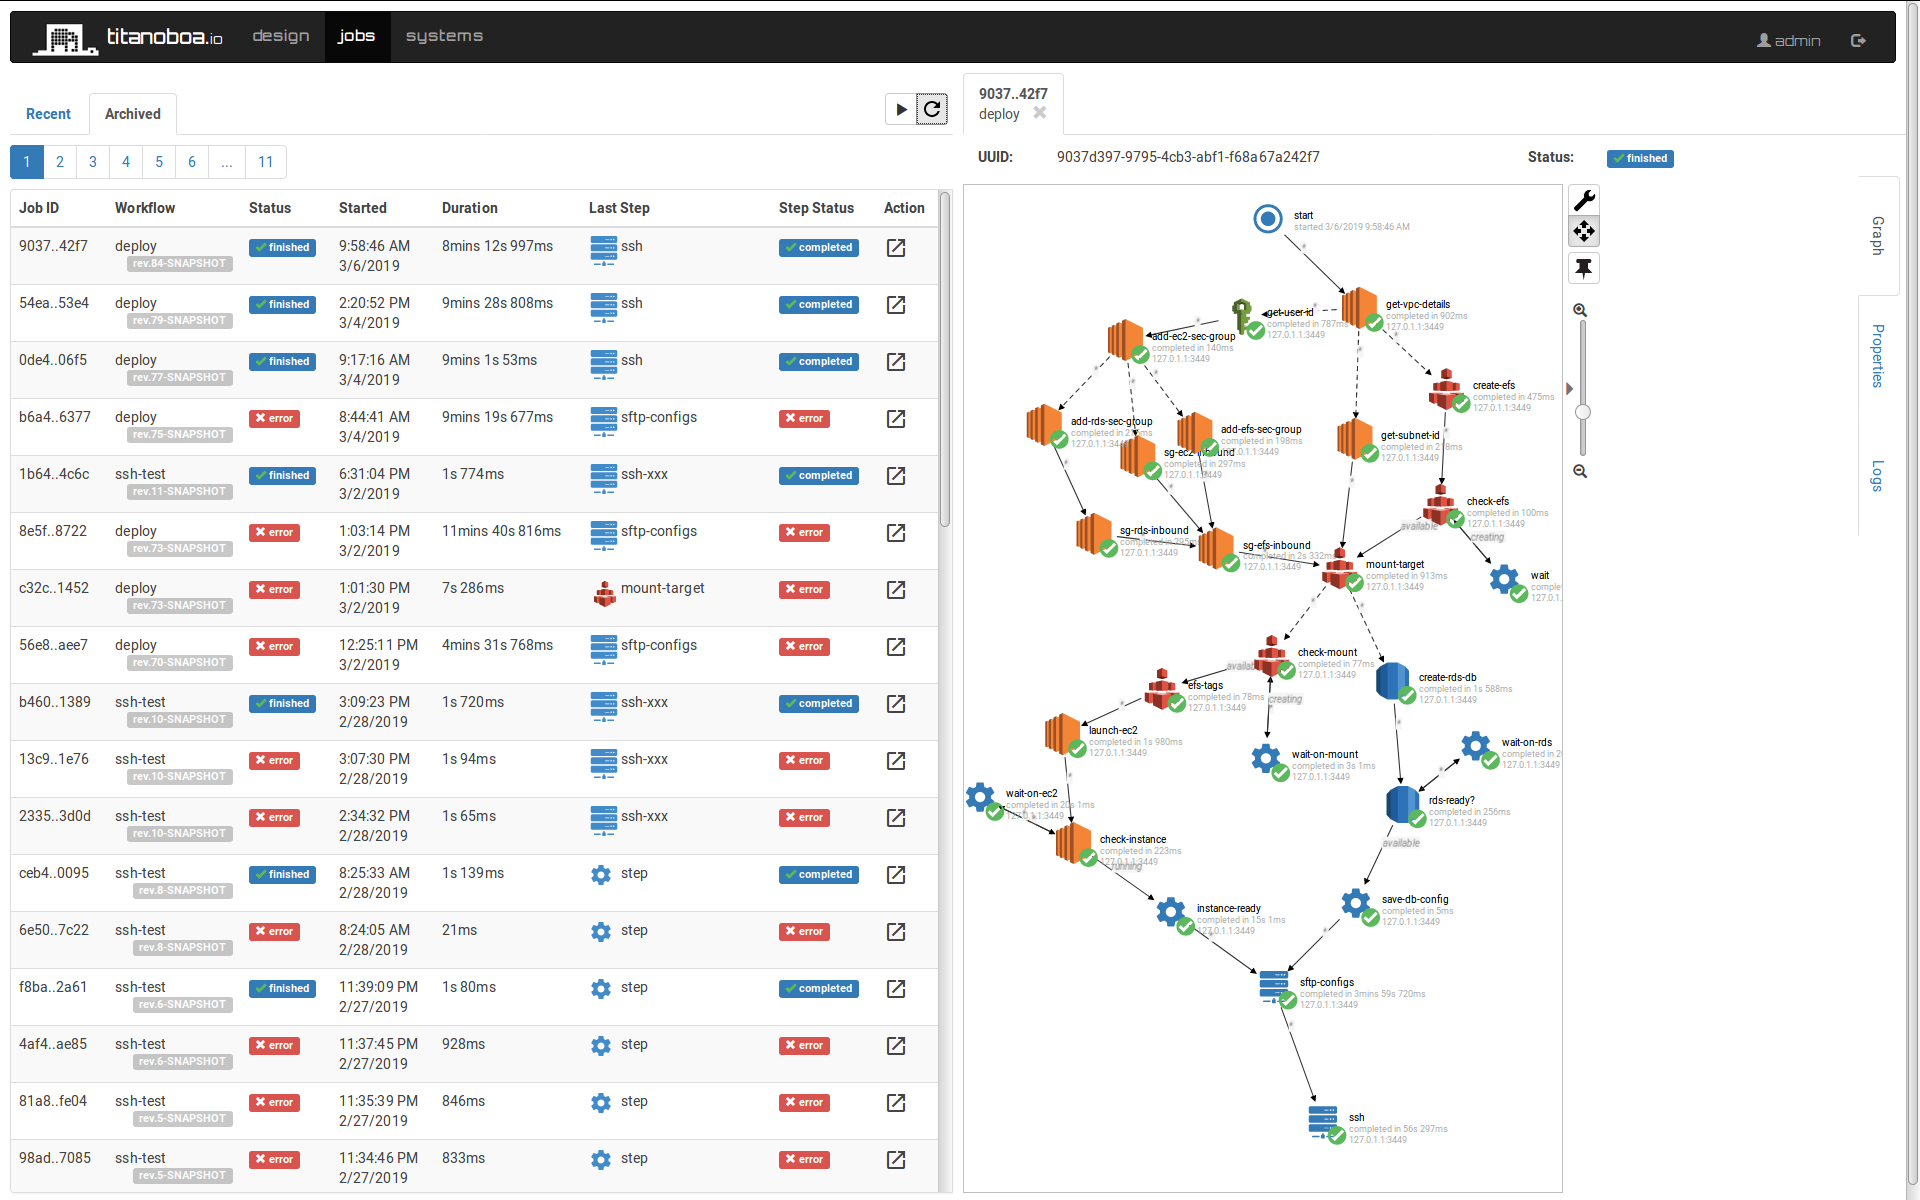
Among other details the workflow returns also the DNS of the newly set up server so you can just paste it into your browser and straight away connect to your newly set up titanoboa server!
This job required following external dependencies to be added to titanoboa's setup:
{:coordinates [[com.amazonaws/aws-java-sdk-s3 "1.11.237"]
               [com.amazonaws/aws-java-sdk-rds "1.11.237"]
               [com.amazonaws/aws-java-sdk-ec2 "1.11.237"]
               [com.amazonaws/aws-java-sdk-efs "1.11.237"]
               [io.titanoboa.tasklet/ssh "0.1.0"]]
 :require [[amazonica.aws.s3]
           [amazonica.aws.s3transfer]
           [amazonica.aws.ec2]
           [amazonica.aws.rds]
           [amazonica.aws.elasticfilesystem]
           [io.titanoboa.tasklet.ssh]]
 :import []
 :repositories {"central" "https://repo1.maven.org/maven2/"
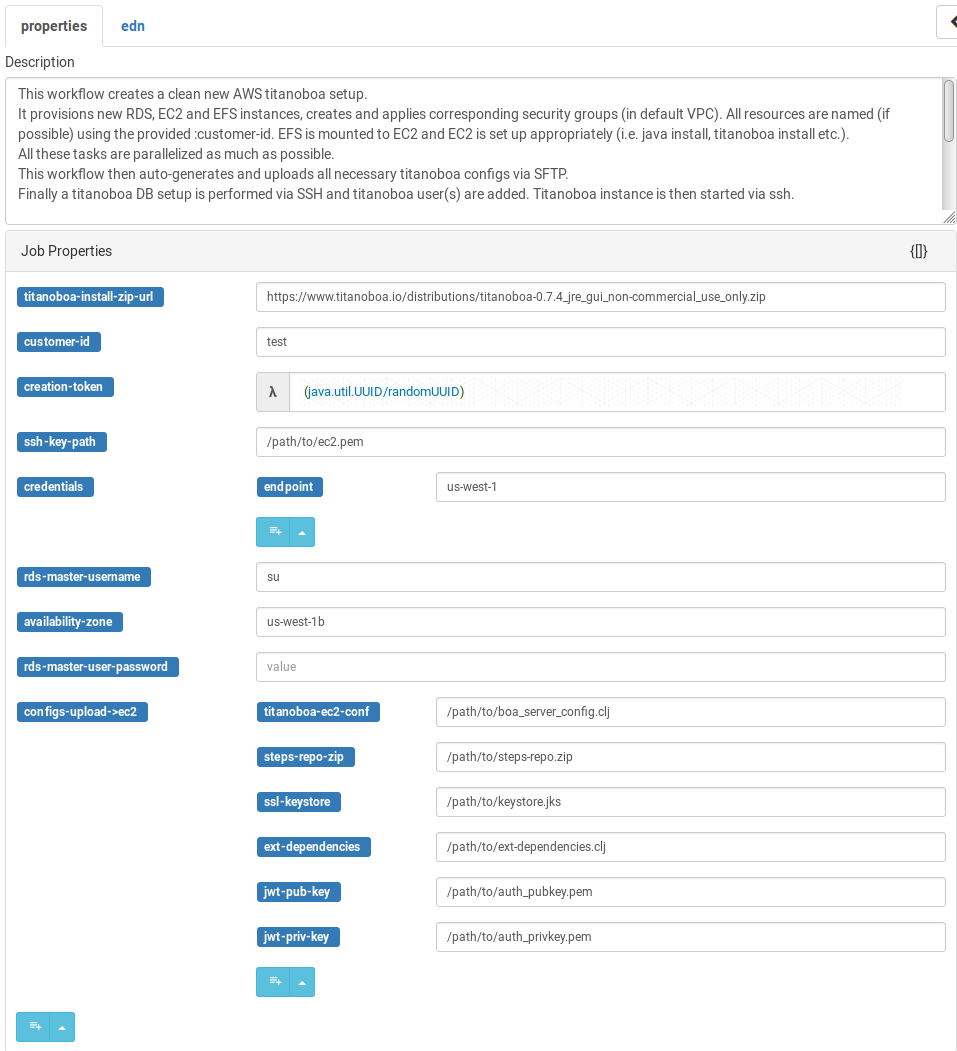
"clojars" "https://clojars.org/repo"}}There are few notable job properties that must be configured properly for the job to run:
Since the EC2 server will be opened to world, it is paramount that the titanoboa instance to be installed is secured properly using JWT and accessible only via HTTPS.
The workflow therefore assumes SSL keystore and another keypair for JWT will be provided, with their respective passwords being provided in the titanoboa config file (boa_server_config.clj). All these necessary resources and configs are specified under :configs-upload->ec2 property.
Note: it is perfectly possible just to create a new keystore with keypair on the fly as a part of the workflow, it is just that I did not need that yet. At some stage I might look into actually provisioning a static IP and a subdomain with a certificate signed by a cert authority (or use AWS ELB to handle that) which will make it a very interesting use case.
Other notable properties include AWS credentials for the AWS API calls - either they contain just the :endpoint (region) to be used (in which case credentials are expected to be set in environmental properties) or they can contain also the :access-key and :secret-key). You can also specify main RDS username/password that will be used as well as path to private key to be used to SSH into the EC2 instance.
In this step's properties you can actually specify which DB to provision (at this stage I use only Postgres), its storage etc.
Launches new EC2 instance based on specified AMI and other properties. A big part of this step is specifying User Data, note how properties are extracted via using the expressions:
Uploads all the necessary configs (including auto generated DB config) to EC2 server. Note how multiple SFTP puts are specified in the properties:
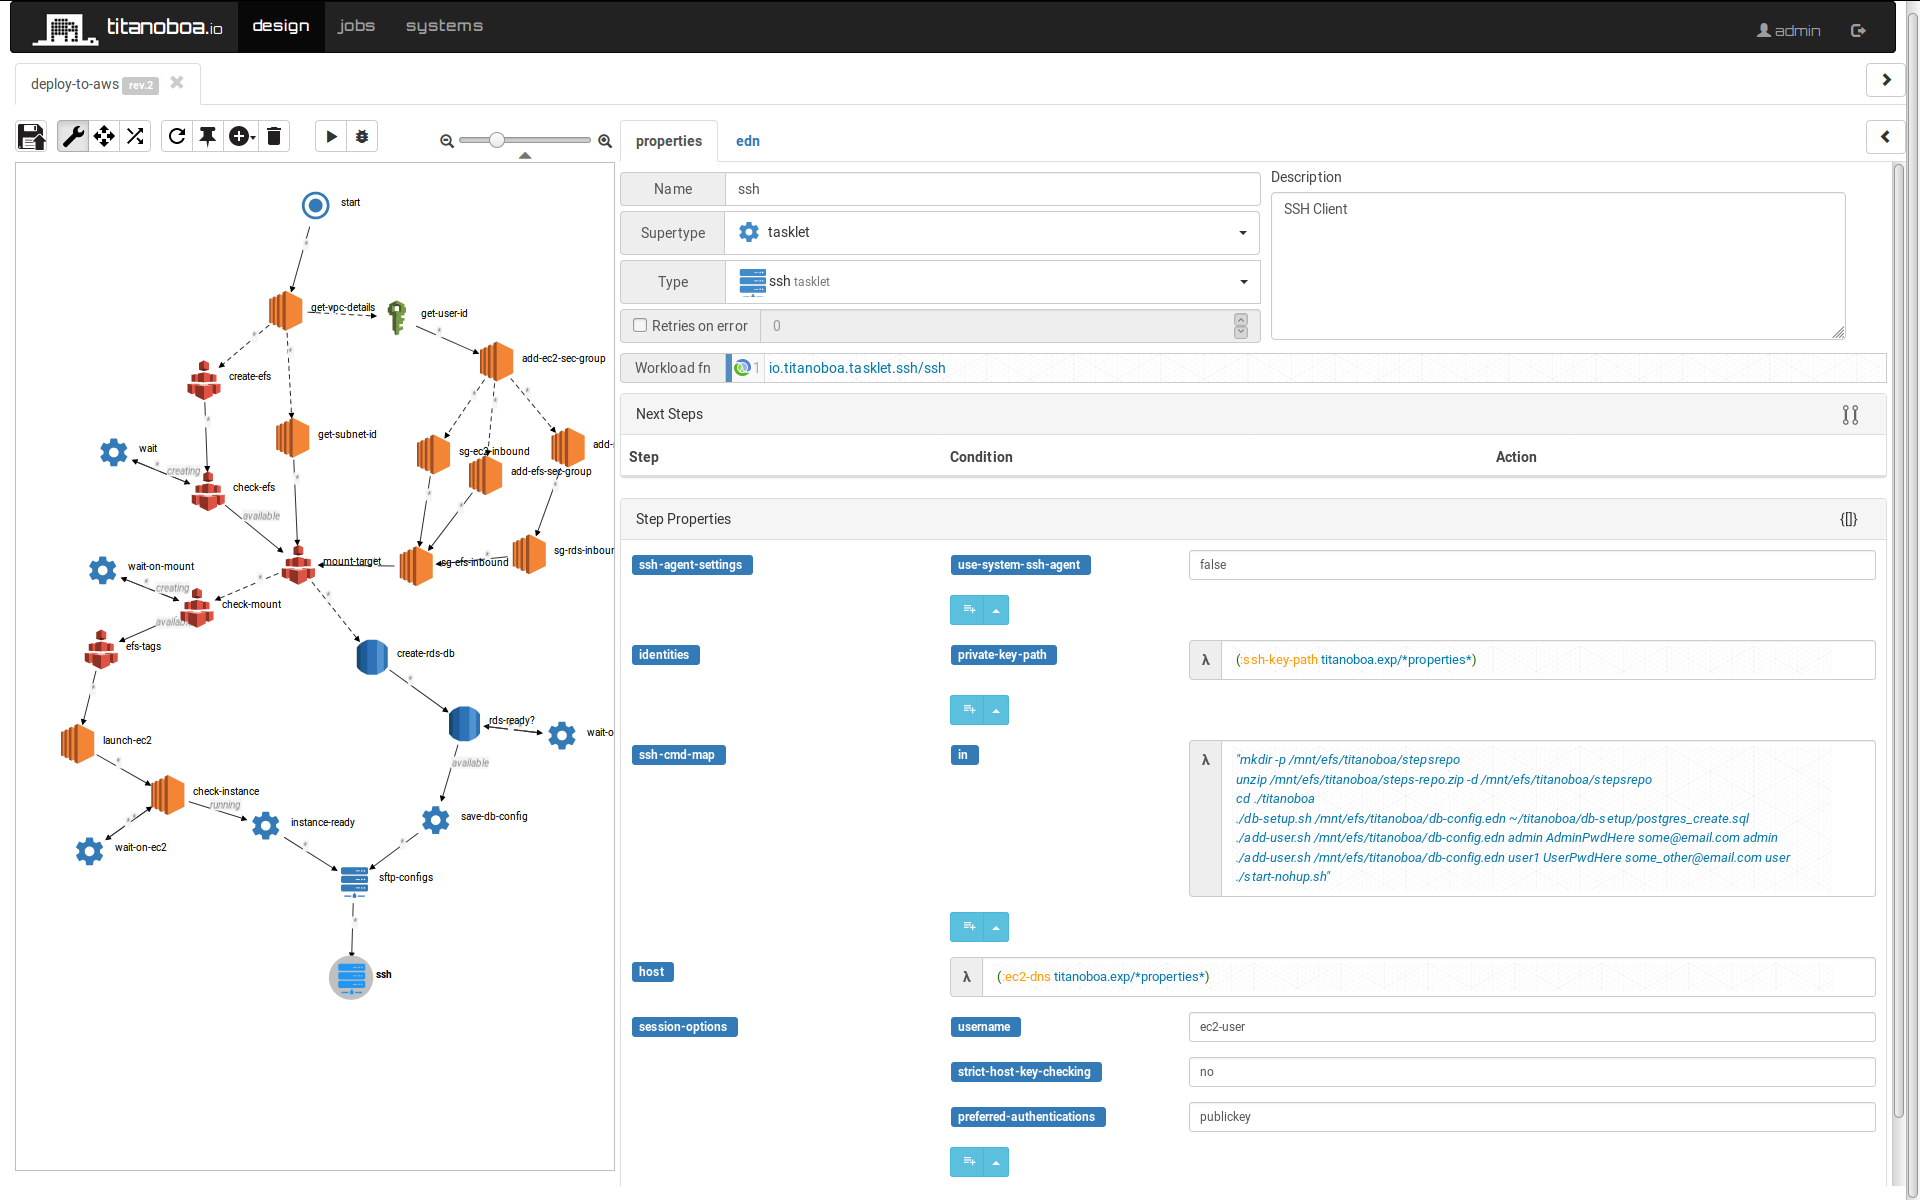
Runs titanoboa scripts to create a necessary DB schema and also provisions some initial titanoboa users.
Then it starts titanoboa server.
Currently the new users' credentials are specified directly within this step but nothing prevents us from separating the user credentials list as a separate property (ideally on the job's level) - the same way as expressions in EC2 user data are handled.
As mentioned above, the whole workflow can be found in this github repository. Read more about tianoboa on our wiki.
